The board can be programmed with code from various languages and integrated development environments (IDEs), including MicroPython, ESP-IDF, Scratch, PlatformIO, CircuitPython, Embedded C, Lua, Node.js, etc.
To get started with the Arduino IDE, the board comes preloaded with firmware. When you connect it to a laptop and open the Arduino IDE, select the board COM port shown in the Arduino IDE’s serial port settings and open the serial port. It will display sensor data in the serial monitor, including temperature sensor data, 3D axis acceleration sensor data, and 3D axis magnetometer sensor data.
Getting Started with Arduino IDE
What You Need
Hardware
- A IndusBoard coin
- USB C cable
- Computer running Windows, Linux, or macOS.
Software
To start using the Indus Board install Arduino IDE on your computer. To install the Arduino IDE kindly click here.
Install the board
Kindly follow the steps below to install IndusBoard coin on Arduino IDE:
- Open Arduino IDE 2.0
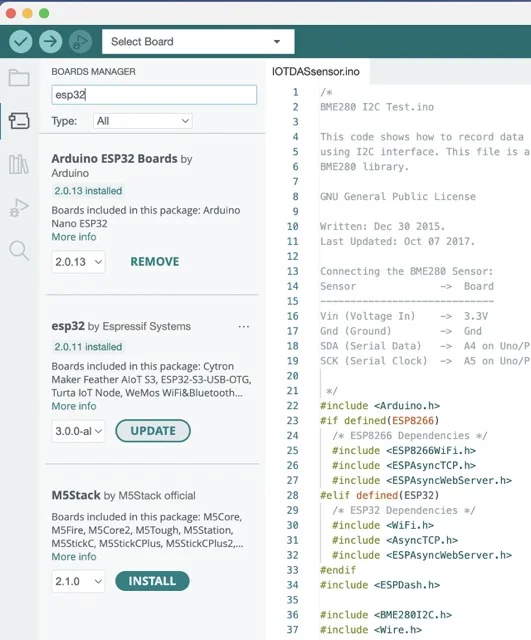
- Go to Board manager from the left panel
- Search for ESP32 in the search box
- Click on ESP32 by Expressif Systems and select the latest version from the dropdown
- Click on the install button
It might take a few seconds to install fully. If you have already installed the ESP32 board on Arduino IDE kindly check the version and update to the latest version.
Still confused? Click here for more details.
Plugin the board for the first time
To get started with the board for the first time kindly follow the steps below.
- Plug your board to the computer or your laptop via USB type C cable.
- You will notice a white LED glowing on the board indicating that the board is connected to your system successfully.
- To check the com port to which the board is connected open the device manager from the search menu of your system.
- Scroll down and click on ports.
- You will see a USB serial device with the com port in the bracket.
- Open Arduino IDE 2.0
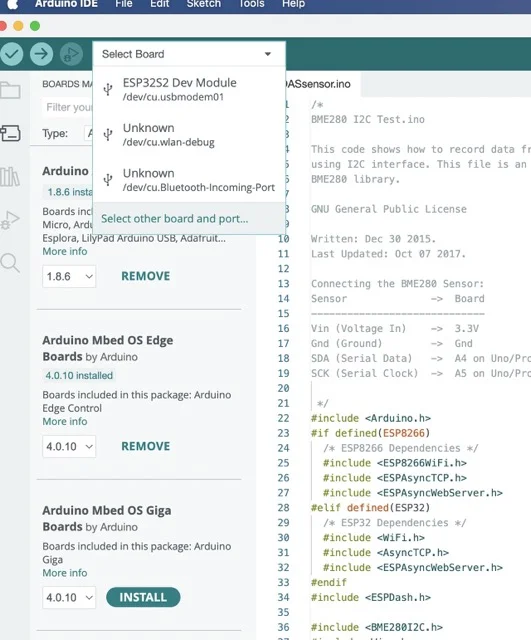
- From the dropdown at the top click on select other board and port. Refer to Fig below


- A window will open with boards and ports.
- Search for ESP32S2 in the search box for boards.
- Scroll down and select ESP32S2 dev module.
- From the port column select the same port you saw with the board in device manager.
Your board is installed and selected on Arduino IDE now. Before getting started, enable USB CDC (Communications Device Class) on Arduino IDE that allows you to communicate to the board like in a serial interface. To do so follow simple steps given below.
- Open Arduino IDE 2.0
- Click on tools at the op panel.
- Go to USB CDC on boot.
- Click on enabled to enable serial communication.

Congratulations! You have completed all the steps successfully and you can begin with your first code on the IndusBoard coin.
Second Method: Getting Started Using Our SDK Kit
Begin by downloading the SDK folder from our GitHub link.
Next, navigate to the “Arduino 15” folder located in Drive C -> Users -> Local -> App Data on Windows. If you’re using a Mac, you can find this folder in the Library. Once inside the “Arduino 15” folder, access the “packages” directory and paste the downloaded SDK folder.
Now, within the Arduino IDE, go to the “Boards” menu under ESP32. You’ll find the “Indus Board” as an option. Select it, and you can start programming the board and enjoy the development process.


Powering Board
You can power the board with usb and other sensors using 5V pin and GND pin on board.
When using board in AP WifI mode use 3V battery or power supply and power board using the 3V pin.
Frequently Asked Questions
Q. What is an IndusBoard Coin?
A. IndusBoard Coin is one of the world’s most compact development boards, sized at just 3 centimeters. As the name suggests, its size is similar to a coin and hence it’s the perfect board for Wearable Electronics.
Q. What is unique about IndusBoard Coin?
A. First and foremost –it’s a super small development board.
Second, despite its small size, it provides a wide range of features for IoT applications and some basic level AI & ML capabilities too.
Simply said, it’s a coin-sized board that is ideal for Wearable Electronics projects. Plus, has the power and features to support a wide variety of exciting projects.
Q. Who is the ideal customer for IndusBoard Coin?
A. The ideal customer for IndusBoard Coin is a techie who has worked with one or more simple development boards like Arduino, and now wants to develop more exciting and powerful projects.
Techies wanting to develop small-sized or wearable electronics projects are also the “ideal” customers.
Q. I am a newbie. I have never worked on a development board. Shall I invest in an IndusBoard Coin or should I first buy a simpler board to learn the basics?
A. Good question. As a newbie, you have 2 options:
-
- Invest in a basic board. Learn basics, and then for IoT or wearable projects invest in IndusBoard Coin.
-
- Or else, you simply invest in an IndusBoard coin and learn the basics, and then develop more complex projects.
In simpler words, the IndusBoard Coin is a super simple development board, which even allows you to program it using a kids-friendly IDE like Scratch, so there is NO REASON for you to waste your money in buying another board, and then later upgrading to IndusBoard Coin.
Q. What can I learn by using this board? In other words, can I use this board to learn Embedded Systems, or IoT, or microcontroller programming, or development of AI & ML applications?
A. Glad you asked. Almost all development boards enable you to learn embedded systems. You are able to program their MCUs using development tools called IDEs such as the Arduino IDE.
By interfacing them with other electronics components, you get to learn a certain amount of electronics-design too.
Thanks to its in-born Wi-Fi capability, this board is perfect for you to learn development of IoT projects too.
Plus, because of the integrated sensors, you can learn how to use them and develop applications that can sense, compute and/or transmit.
Thanks to the powerful chip of this board, you can even learn how to develop basic level AI & ML solutions.
Last but not the least, the size of the board enables you to learn how to develop small sized projects especially those related to wearable electronics.
Q. Can you shed some more light on the tech features that make it unique?
A. Yes, here’s the list:
-
- INCLUDES IMP SENSORS: Many sensors are included on the board itself so that you can develop IoT or smart applications. Most boards of this size need you to add more modules to add sensors thereby increasing the overall size of your project.
-
- 30-PLUS GP IOs: In many boards we find that there are not enough General Purpose Input Output points. Therefore if your project demands addition of multiple connections (for example adding peripherals like keyboard, display, etc)–it becomes impossible to add.
-
- 10-PLUS TOUCH SENSORS: Most popular boards require you to add and connect buttons for any input. But, for IndusBoard, you have 10 touch-buttons included. So a variety of input can be obtained by the board itself.
-
- FLEXIBLE GP IOs: In typical boards, the GP IOs have fixed functions. However, in IndusBoard you can program and use the GP IOs for whatever function you need.
-
- FLEXIBILITY WITH IDE: You can use a variety of IDEs (development platforms) to program this board. Options range from the IDE used by school kids: SCRATCH to the more popular Arduino IDE, to what AI/ML experts use: Micro Python. Simply install the one you like on your PC and connect it with the board with help of the USB cable provided.
-
- THE SIZE: Last but the most important point, the size of this board enables you to develop unique wearable or small-sized solutions, which you can’t with other development boards.
Q. How would you compare IndusBoard Coin with typical Arduino boards?
A. Here’s a quick list:
a) Much more powerful processor
b) Super small size
c) On-board Wi-fi capability
d) Bigger ROM and RAM enabling more complex code
e) On-board sensors in a basic level board
f) Higher number of GPIO pins enabling
g) OTG (on the go) support enabling you to use USB port for a wide variety of applications
h) Flexibility in use of GPIOs
h) Created in India!!!
Q. What are the key technical features of IndusBoard Coin which back your claim?
A. Despite its small size, it hosts a powerful 32-bit microcontroller (ESP 32 S2) with TWO ULP Risc-V processors, 2 MB SRAM, and a variety of inbuilt sensors, making it ideal for IoT projects that have space limitation, and wearable electronics projects!
Its sensors include accelerometer, magnetometer, temperature sensor, and 30+ touch sensors for all its pins. It also has the capability of interfacing with important communication interfaces including Wifi, Thread, I2S, DAC, PWM, SPI, I2C, CAN BUS, and USB-OTG.
Q. Why do the above list of sensors matter?
A. Most boards of similar size do not have these sensors. But most IoT or Wearable Electronics designs need such sensors for motion tracking, gesture detection, etc. By including them on the board itself, we have made IndusBoard Coin a true coin-sized IoT development board.
Q. What can I learn by developing projects on IndusBoard Coin?
A. Good question, you can learn the following:
1. Basic embedded systems including programming a microcontroller
2. Developing IoT designs where you not only SENSE but also TRANSMIT data or do COMPUTATION on edge
3. You can even do basic level AI / ML applications
Q. Which are the popular development boards which can be replaced by IndusBoard?
A. IndusBoard can replace a long list of popular development boards without any loss of functionality, including:
1. Arduino DIY Boards
2. Node MCU Boards
3. ESP32 Boards
4. Seed Studio XIO Series
5. Raspberry Pi RP 2040
and ADA Fruit, Metro, and other similar boards
IN OTHER WORDS, RATHER THAN BUY ANY OF THEM, YOU CAN BUY INDUSBOARD COIN, AND DO WHATEVER PROJECTS YOU WANTED TO DO ON THEM
PLUS, MAKE PROJECTS WHICH YOU COULD NOT. AND, IN SUPER SMALL SIZE!
Q. Does IndusBoard support touch sensors?
A. Yes, as mentioned as its key USP, IndusBoard Coin is equipped with 30-plus touch sensors, allowing for touch-based interactions in your projects.
Q. How can I program the IndusBoard Coin?
A. While you can program IndusBoard with a variety of IDEs, we suggest you use the Arduino IDE which is simple to use and gets installed easily on a wide range of laptops and desktops. Plus, it supports a wide range of device drivers and libraries..
Q. What are the common applications of IndusBoard?
A. IndusBoard is versatile and can be used in various applications such as monitoring, navigation systems, fall detection, gesture detection, and wearable electronics.
We have published a few fully developed projects on our website, and on www.electronicsforu.com. Plus, we will be sharing an exciting list of possible project ideas for you to develop on a regular basis.
Q. Where can I get the pinouts and more details about the board?
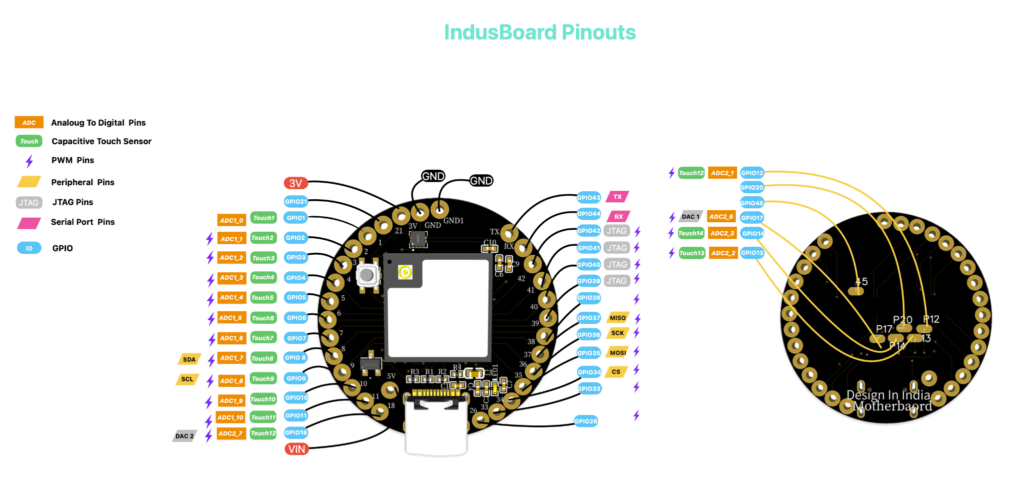
A. You can check here https://indus.electronicsforu.com/getting-started-with-indusboard/.
Q. Is there any warranty covering my IndusBoard Coin?
A. Yes, the board is covered by a 1-month manufacturing warranty. Herein, we will replace your board in case there is any manufacturing defect found during your FIRST USE.
By FIRST USE, we mean that you found a defect while testing the board using the steps outlined below.
However, if you start development of a project, then we cannot know whether the failure happened due to faulty connections at your end or not. In that case, we will not be able to honour the warranty.
Q. How can I test the board without developing a complete project?
A. Great question. Here are the simple steps:
POWER-ON TEST
i) Connect the board to your PC using the USB cable provided
ii) An LED will turn ON when it gets the power
iii) This means that the board is turning ON
CONNECTING TEST
i) The board will be recognised as USB-Serial on your computer
ii) This means that the board is communicating
SENSOR TEST
i) Search and Download Arduino IDE (or any other IDE of your choice)
ii) Launch the IDE Software
iii) Select “TOOLS” on the menu and “SERIAL MONITOR” under sub-menu
iv) The SERIAL MONITOR window will open
v) On bottom of the SERIAL MONITOR you see Baud Rate, select it as 115200
vi) You will start seeing values provided by sensors
GP-IO/TOUCH SENSOR TEST
i) Touch the GP-IO 4 switch and you will get message on the screen to confirm the touch
ii) This confirms that your GP-IOs are also working
Q. Anything I need to be careful about?
A. Yes, there are a few precautions you need to take:
-
- Do not short circuit the board by putting the wrong polarity.
-
- When turned ON, don’t put your board on a metallic surface as there are multiple electrical points on the board which may get shorted
-
- If you are using the board as a Router (AP Mode), after you upload the code, use a battery to power the board and not via the USB. This is to avoid the Voltage Regulator connected to the USB-port from getting overheated.
-
- This is NOT a water-proof board. Hence, avoid all liquids to prevent short-circuiting.
Q. Can I get an electrical shock while using this board?
A. As this board operates on a 5V DC power supply, hence you cannot get an electrical shock under normal circumstances.
Q. Does it have a UFL connector for me to extend the Wi-Fi range?
A. Yes, it does have a UFL connector enabling you to use a variety of antennae based on your application.
ORDER & DISPATCH
Q. What all is included in the package of an IndusBoard Coin?
A. Great question. We have designed the package such that you don’t need anything else to test or develop some exciting projects. Thus, the typical IndusBoard package includes:
-
- The IndusBoard Coin development board
-
- A USB-C cable to connect the board to your computer
-
- Few LED strips to do basic tests
-
- Few header pins to connect the board with a bread-board (so that you can put other components on the breadboard and avoid soldering them on the IndusBoard coin).
-
- Transparent plastic case: For you to keep the board in–not only when storing your board, but even when using or displaying your project.
Q. I want to resell the IndusBoard Coin to my customers. How can I do that? Are there any incentives?
A. Thanks for asking. We invite like-minded partners who understand the potential of the IndusBoard Coin and why it can be a great tool for electronics and embedded systems enthusiasts.
Q. How can I buy my IndusBoard Coin?
A. It’s simple. We have ElectronicsForU.com as our online shopping partner. You can simply click on the BUY button to go to that page, pay the money and we will ship your board within 1 working day.
Q. How much time will it take for the board to reach me?
A. It should take a maximum of 5 working days to reach you. However, if you need it within 3 working days, please select the EXPRESS DELIVERY option. Herein, we charge you a bit extra to send it through the Super Fast delivery option offered by our courier service.

